Thursday, 9 March 2023

Bougainvillea - swathes of colour in the Bahamas


One of the small pleasures of travelling to warm countries is spotting houseplants growing in the wild. Palms, delicate succulents, coleus, Ficus, growing freely on roadsides and in gardens. And, distinctively and flamboyantly, bougainvillea - 

Bougainvillea, star of tropical and sub-tropical zones around the world, is everywhere you look on Long Island, Bahamas, for example: growing wild, or as hedges, scrambling into trees, or carefully tended specimens in people's gardens. Its frothy hot pinks and reds contrast sharply with the blue seas and skies that hog the view otherwise -


Bougainvillea is native to south America, but was enthustiastically collected in the rly 19th century by plant hunters and spread all over the warmer climes of the world. In areas where conditions are to its liking - the Mediterranean, Caribbean, California, south-east Asia, Indian sub-continent and Australia, for example - it is easy to grow and responds well to pruning. It's drought-tolerant, salt-tolerant (so a good coastal plant), evergreen ... just don't let it get cold.


It's not remotely frost-hardy and will drop all its leaves below around 10 degrees Celsius, so for the UK it will need to be in a conservatory or a heated greenhouse, although it will grow on happy outside in summer.


Although renowned for its colourful flowers, the actual flowers are the small cream or white tubular centres - the surrounding 'petals' are really leaf bracts, in magenta, pink, red, orange, yellow or white, which make the bourgainvillea such a distinctive and showy plant.

'Bougainvillea-growing' would be a pre-requisite for any country I might emigrate to -


Tuesday, 21 February 2023

Hugelkultur - composting in situ


I first read about hugelkultur at a serendipitously good time. I had just had to prune out damaged branches from both the plum and quince trees after a storm, and the wood was piling up next to the bonfire. Separately I was also trying to think of ways to irrigate the blueberries, housed in pots of ericaceous compost and sunk into the ground. At the same time, it was the start of the year and my perennial new year's resolution, to garden more sustainably and with less waste, was uppermost in my mind.


Hugelkultur is really a long - German for 'hill culture' - word to describe composting in place, which gardeners have been doing for generations, but layering the matter to be composted in a specific way to conserve moisture in the soil as well as providing slow-release nutrients for plants. 

It is also a good way to use woody waste - logs, brushwood, twigs - that might otherwise go on a bonfire, now that many of us are trying to move away from burning waste, specially in built-up areas.  

The photo at the top shows a finished hugelbed, planted up. They make an attactive garden or allotment feature in their own right; you could design a lovely curved hugel bed to add contours to your plot.

Constructing a raised bed using hugelkultur principles

1. Dig out a trench where you plan to build the hugel bed. Save the earth, etc, that you dig out, and if you're digging out turf, try to save it in blocks - you will need to replace it later.

Ideally you want to dig down to the water table, but 30-45cms is a good depth, the deeper the better. The trench should be wide enough to take good-sized tree logs, but not so wide that you won't be able to reach to the centre when it's built - no more than a metre. This will also give you room to bank up the sides gently.

2. Start filling the trench, first with the larger logs, branches, woody waste. If the wood has already started to rot a bit, then so much the better. Try not to use green wood which might start to sprout. The kinds of wood that you are likely to be cutting down or pruning on an allotment or in a garden such as ash, beech, birch, apple, pear, cedar and other conifers, are all suitable for a hugel bed. 

3. Pack the logs in as tightly as you can, even chopping them up a bit so they fit if necessary.   

4. The next layer to go on top is the brushwood, smaller branches, twigs, etc.

5. Next, pack into the trench any more organic matter you may have: straw, green leaves (not whole weeds), seaweed, if you live near the coast, mulch, leaf mould, grass clippings, anything tht might normally go on the compost heap.

7. Now turf the bed, the surface of which should now be at least at ground level if not slightly raised. This turf should in theory be the turf that you initially dug out of the ground to create the footprint of the bed. Lay it 'upside-down', ie, with the grass on the underside and the topsoil uppermost. This forms a firm base for the bed. 

8. Add a top layer of compost, about 8-10cms thick. You should now have a gently mounded raised bed, ready to sow or plant into.   

At this point, I have found that for purely practical reasons, my hugel beds have been more stable if I give them wooden sides as with a conventional raised bed. So they are not strictly orthodox, but the principles are the same.

How it works
The logs on the bottom layer absorb water, and once saturated, slowly release it, along with nitrogen and other nutrients as the logs slowly break down. The smaller branches and greeen waste break down more quickly into composted organic matter, feeding your plants.

The turf layer also breaks down, giving you a nice fine topsoil tilth to plant into. The top compost layer gives you a good starting point. 

Hugelkultur - pros and cons
+ sustainable and inexpensive - uses readily available - and free - materials;
+ provides slow-release nutrients for plants;
+ as the woody materials and organic matter breakdown, the process generates heat and warms the bed, giving you better germination and extending the growing season;
+ reduced need for watering.

- labour-intensive to set up and build;
- benefits may not be apparent the first year as your hugel settles down and continues to absorb nitrogen;
- banked sides may need support.

Having tested this out on the blueberries, last year I built a second hugel bed for the blackcurrant bushes grown from cuttings taken the previous year. Once everything was in situ, we then went through a three-month drought in the summer of course. The plants in the new hugelbed struggled a bit  - they were very young cuttings, after all, but in the established blueberry bed, I managed to get away without having to water them at all, and they survived.

Further reading

Thursday, 17 February 2022

Hellebores - winter jewels in the garden

Helleborus argutifolius - Corsican hellebore

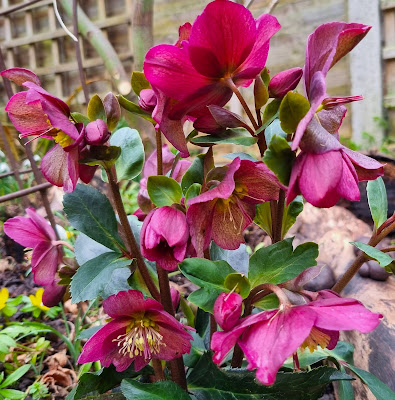
Hellebores are brightening up the garden right now, both in containers and under the Acer, where they mingle with the snowdrops and aconites to create a miniature woodland glade in my town garden.
Helleborus 'HGC Mme Lemonnier'

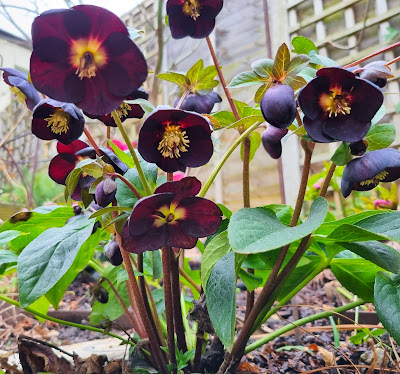
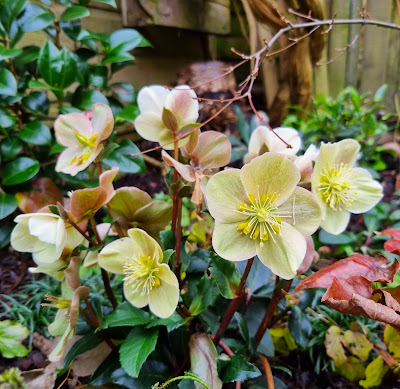
I love the rich jewel colours of H. 'HGC Mme Lemonnier', above (that gorgeous crushed-velvet red), and the dark midnight purple of H. x hybridus 'Naomi', below. But I always come back to the ice green of H. argutifolius and H. niger 'Christmas Carol ', with its pure, pure white flowers, to plant over and over again, in pots, to lighten up the patio and pathways.


Helleborus x hybridus 'Naomi'


Helleborus 'HGC Cinnamon Snow'


Helleborus niger 'Christmas Carol (Christmas Rose)


Friday, 15 January 2021

Extend the growing season with a hotbed


Other people's gardens are always full of good ideas and inspiration, and few more so than Barnsdale, the garden of the late garden writer and presenter Geoff Hamilton. This 8-acre site is home to Hamilton's extensive kitchen garden and around 38 demo gardens or garden rooms. On my last visit I was particularly taken with the hotbeds in the kitchen garden.

I've been interested in hotbeds since reading of the Victorians' enterprise in building them to grow tropical fruit such as pineapples. But Barnsdale also demonstrates something else: the use of hotbeds to extend the growing season, getting seedlings off to an early start; as a nutrient-rich environment for hungry crops (courgettes, squash, beans, cucumbers) later in the summer, and then as a generator of well-rotted manure for the following seasons.

I've recently embraced the no-dig system of vegetable gardening with all the zeal of the convert, which means I need more and more compost, or manure, or organic matter generally, to cover new beds and top up existing ones. Buying it in each time would become very expensive very quickly. The obvious answer is to generate one's own. The vegetable compost heap is a rich source of - free - organic matter, and a hotbed adds an efficient - and free, again - source of manure.

The base of the bed is a four-sided box - I made my first one from leftover composite decking and a second one from gravel boards. You can then place a cold frame on top - again, either one you have already, or a DIY job. My DIY cold frame was made with more decking - softwood, this time - with the side boards cut diagonally lengthways to create a sloping lid. You can just see this in the picture, and the cold frame is positioned so that the angled top faces south to catch the best of the sun. I saved our two big double-glazed bathroom windows from our house renovation and these make a well-insulated glass lid. (Although they are rather heavy.)  


Position the cold frame on the base so that the glass cover faces south, if possible, to get as much light and warmth as possible in colder months. 
                                                
       
Hotbed number two, made with deckboards and lined with black plastic to help with heat retention.

The base is then filled with fresh - not rotted - manure. You may be able to get a local farmer or stables to deliver this, but for me it's a visit to the local stables to load the car up with bags full of fresh manure from the muckheap. Again, it's free, which is largely the point of doing it this way, but I do have to factor in the cost of having the car valeted afterwards. The smell lingers on a bit.

Once the base box is full of fresh manure and you've tamped it down to ensure the box is properly full, put the cold frame on top and fill with compost to a depth of around 5cm. Then fit the lid over the top and leave the manure for a week or so to settle. The contents will heat up under the glass and begin to rot down. You will probably find it sinks quite a bit in just a fortnight.


Top up with more compost to about 10cm depth, and from mid_January you could be ready to start sowing seeds for an early harvest. Sow thinly directly into the hotbed compost and keep the glass lid  on until they have germinated. Depending on the weather, I will start lifting the lid to ventilate the bed once the true leaves are showing, but will replace it at night and if temperatures drop.

I've sown salad leaves, lettuce, rocket, lamb's lettuces, radishes and Chinese broccoli in the hotbed in the third week of January and been eating fresh salads 4-6 weeks later. The beauty of the cut-and-come-again salad leaves is that you can keep cropping them all the way through until the summer.


Once the salad leaves begin to bolt in midsummer, you could re-sow, but instead I pop in a couple of courgette plants and watch them romp away as the roots reach the manure gently decomposing under the thick compost layer. Two courgette plants will grow to fill a 100cm x 75cm hot bed and provide plenty of courgettes throughout the summer and autumn.


 Other greedy crops such as squash, cucumber and beans could also go in the bed in summer. 

In autumn, once the courgettes have gone over, lift out the plants and chuck them on the compost heap. In the hotbed you should now find a thick layer of fabulous well-rotted manure ready to be dug out and used on the next season's growing beds.

And once the hotbed is empty, you can start all over again with a visit to the local stables ...


Wednesday, 23 December 2020

Happy Christmas from The Urban Hedgerow

 A pretty challenging year all round in 2020 and also a busy one - my thanks go out to suppliers and contractors who kept going in restricted times, and to all my lovely clients who entrust me with their gardens.

Wishing everyone a peaceful and happy Christmas and better times in 2021 -


Monday, 17 August 2020

A front garden on a hill

A hilly site brings its own challenges. This sloping front garden in Weybridge, Surrey, has three partially submerged retaining walls built with sleepers, with the above-ground rocks performing a more cosmetic job of keeping the soil in place.

We planted mainly evergreen shrubs, forming neat domes, to create undulating waves of greenery from the house down to the street. Once established, their roots will also help with soil retention.
The centrepiece is a multi-stemmed Amelanchier lamarckii (Juneberry) tree, which will give the clients starry white blossom in spring and wonderful red and orange foliage in autumn.

Our timing wasn't great, planting up just before the mighty heatwave and drought, but we also installed a simple short-term irrigation system and the clients have done a fantastic job of keeping the plants watered. The new shrubs must be happy - the climbing rose (Rosa ''Pilgrim') has flowered since being planted up in its new home -


Thursday, 2 July 2020

The versatile Pittosporum Golf Ball

Giving these Pittosporum tenuifolium Golf Balls a trim this morning, I reflected that while it's a pretty unassuming plant, it's also probably the first shrub on the team sheet for most of the planting schemes I design.


It seems to do well in the London clay soil, and is happy in anything except deep shade. They're good mixers too: the bright-but-not-showy green leaves blend well with other greens and different textures. They can be clipped, not too tightly, into spheres, or left to grow out into shaggier spheres - they're a naturally tidy plant.

And versatile: I've planted them as standalone shrubs, as hedges, as focal points in a border, and as Buxus substitutes. And they're evergreen, so look good all the year round.

Sunday, 14 June 2020

Flowers for midsummer

 Midsummer flowers, from my own garden for once, revived by a bit of midweek rain -

Lilium martagon 'Arabian Knight'. It has taken me a while to get these to establish and I would love to fill my borders with them. They like well-drained soil - this one has popped up in the sunny bed that never gets watered, even though I have always though of them as a plant that liked partial shade.

Left: bee ascending Allium 'Mount Everest', a tall, stately pure white-flowered allium that contrasts exceptionally well with the purple varieties. Right: sweet peas catching the morning sun.

Viburnum opulus 'Compactum' in the foreground; paeonies and Geranium 'Rozanne' towards the back. Rozanne will carry on flowering all through the summer and into the autumn.

Climbing hydrangea - Hydrangea anomala subsp petiolaris - takes a while to establish and get going, but once it does, it gives it back in spades every spring. The white blooms surround tiny foamy white flowers, and last for a couple of months before beginning to fade. The bright heart-shaped leaves cover the fence beautifully too. 

Paeonia lactiflora 'Bowl of Beauty' - just about going over here - on the left, P. lactiflora 'Bowl of Cream' (I think) on the right, overseeing the Geranium nodosum.


Rosa 'Iceberg' climbing up the fence. The new flowers don't aways show these pink tips and the colour soon fades to pure white -


Saturday, 18 April 2020

Creating an outdoor room in north London


When we first saw this small and rather hemmed-in courtyard in north London, it was immediately apparent that the space would be best served by using just a few well-chosen materials.  The client was overseeing major interior decoration as well and wanted style of the new garden to flow effortlessly from the house.

The client wanted a garden to sit and relax in but also for socialising. Plenty of seating space despite the size was a priority. A small recessed area to the right of the courtyard will be used to house a barbecue and outdoor kitchen units. The client also wanted to be able to grow herbs for the kitchen, and we installed the green wall, using vertical garden pods from Green4Air, and with a solar-powered irrigation system supplied by Irrigatia.

The patterned tiles were chosen from the Sorrento range supplied by Fired Earth. The intricate detailing might have been overwhelming in a larger patio but in this compact space they brought light and texture.

The cedar bench was designed by The Urban Hedgerow built from scratch onsite by Graham Thompson of Creative Landscapes London, creating enough room to seat 8-10 people comfortably - or for fewer people to stretch out on cushions. The fence to the right was also built on site using materials from Jacksons Fencing and the corten steel screen, covering an unsightly gap in the rear wall was supplied by Stark and Greensmith.


The handsome bamboo plant was already in the raised bed to the rear, which was giving new edging and coping to match the cedar bench and the soil reconditioned. The bamboo was thinned and trimmed to let in the light and give it a boost, then underplanted with Choisya ternata 'Aztec Gold', an evergreen shrub with fine dissected leaves to throw interesting shadows against the fence and screen and with long-lasting white flowers in spring and summer.

We installed uplights in the raised bed to highlight shapes of the bamboo and other plants after dark.

The dark blue colour of the fence echoes the colour scheme inside the house. Exterior wood paint from Little Greene

The individual living wall pods are fixed to a framework on either side of the doors to the garden. The 1ltr pods each hold culinary herb and salad plants, including rosemary, thyme, oregano and rocket. In summer the pods will also hold a number of colourful edible flowers.
Plenty of seating with the bespoke cedar bench and the bistro table

Left: the old softwood deck was replaced by the patterned tiles, right. The built-in deck provides plenty of seating without clutter, and uses the existing wall of the raised bed as a backrest.